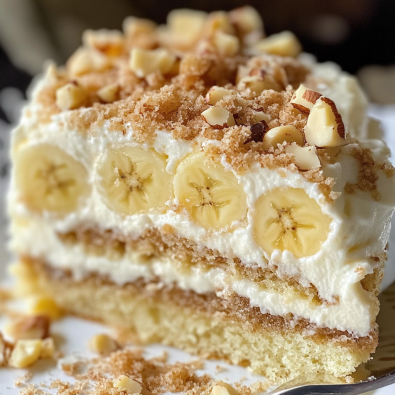
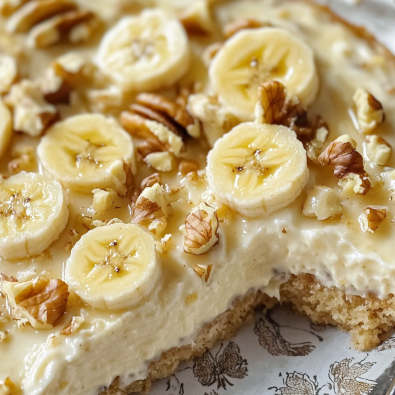
If you’re a fan of rich, creamy desserts with the sweet flavors of banana and a hint of crunchy walnut, this Heavenly Banana Walnut Cream Cake is for you! This no-bake dessert combines smooth cream cheese, banana-flavored pudding, and a buttery Nilla Wafer crust for a luscious treat that’s bound to be a crowd-pleaser. Perfect for any occasion, this cake is easy to prepare and ideal for both everyday enjoyment and special gatherings.

Ingredients
- Crust
- 3 cups Nilla Wafer cookie crumbs (approximately one 11-ounce box)
- ½ cup butter, melted
- Filling
- 1 pint heavy whipping cream
- ¾ cup sugar
- 24 ounces cream cheese (3 8-ounce packages), softened
- 2 packages instant banana cream pudding mix (3.4 ounces each)
- Optional Garnish
- Whipped topping and banana slices for a beautiful finish
Directions
1. Prepare the Crust
Start by preparing the base of this dessert: a buttery Nilla Wafer crust.
- In a medium mixing bowl, combine the Nilla Wafer crumbs and melted butter.
- Press this mixture firmly into the bottom of a square 8×8-inch baking pan (a 9×9-inch pan works well), lined with parchment paper that extends up the edges for easy removal later.
- Chill the crust in the refrigerator or freezer while you move on to preparing the filling.
2. Whip the Cream
The whipped cream adds a luxurious lightness to the cake’s filling.
- In a large metal mixing bowl, use an electric mixer on medium speed to whip the heavy cream and sugar together until stiff peaks form. This step is crucial to achieve the perfect texture for the filling. Set the whipped cream aside.
3. Mix the Cheesecake Filling
The cream cheese and banana pudding come together to create a delightful, banana-infused cheesecake layer.
- In another large mixing bowl, beat the softened cream cheese with an electric mixer on medium speed until smooth and creamy.
- Gradually add the dry pudding mixes, beating well between each addition to ensure a smooth mixture.
- Gently fold in the whipped cream until everything is well combined and fluffy.
4. Assemble and Chill
Once the filling is ready, it’s time to put it all together.
- Spread the cheesecake filling evenly over the chilled crust.
- Cover the pan with plastic wrap and refrigerate the cake for at least 8 hours or overnight, allowing it to set fully. This step is key to achieving the right texture and flavor.
5. Garnish and Serve
Finally, it’s time to enjoy this dreamy dessert!
- Once the cake has chilled, cut it into 9 squares for easy serving.
- Garnish with a dollop of whipped topping and banana slices for a finishing touch. Serve the cake chilled for the best experience.
Additional Recipe Tips
- Variations: Add crushed walnuts or chocolate chips to the crust for an extra layer of flavor. For a lighter dessert, you can use lower-fat cream cheese and sugar-free pudding.
- Storage: Store leftovers in an airtight container in the refrigerator for up to three days.
- Serving Suggestions: Pair this dessert with a cup of coffee or tea, or serve with additional banana slices for an extra burst of fruity goodness.

Serving and Storage Tips
Serving Tips
- Serve Chilled: For the best flavor and texture, serve the cake chilled. The creamy filling holds its shape beautifully when served cold, offering a refreshing and smooth bite.
- Garnish with Fresh Banana Slices: Add freshly sliced bananas right before serving. This not only enhances the banana flavor but also adds a beautiful presentation. To prevent browning, you can brush the banana slices with a bit of lemon juice.
- Add a Whipped Topping Dollop: For an extra indulgent touch, top each slice with a dollop of whipped cream or whipped topping.
- Pair with Coffee or Tea: The cake’s rich, creamy flavor complements a cup of hot coffee or tea, adding a nice contrast to the dessert’s sweetness.
Storage Tips
- Refrigerate Leftovers: Store any leftover cake in an airtight container in the refrigerator for up to 3 days to keep it fresh.
- Cover Tightly: If you’re storing the cake in the same pan, cover it tightly with plastic wrap to prevent it from absorbing any refrigerator odors.
- Avoid Freezing: This dessert is best enjoyed fresh. Freezing may alter the creamy texture of the filling and cause separation upon thawing.
- Prepare in Advance: The cake can be prepared up to a day in advance, making it a convenient dessert option for parties and gatherings. Just add garnishes right before serving.
Enjoy every creamy, banana-filled bite with these simple serving and storage tips to keep your cake tasting fresh and delightful!
Variations
This Heavenly Banana Walnut Cream Cake recipe is already a delicious treat, but there are many creative ways to add a personal twist! Here are some fun variations to make this dessert even more unique and suited to
Here are some tasty and creative variations to add new flavors to your Heavenly Banana Walnut Cream Cake:
1. Banana Chocolate Delight
- Chocolate Crust: Substitute Nilla Wafer crumbs with crushed chocolate wafer cookies or Oreos for a chocolatey base that complements the banana flavor.
- Chocolate Ganache Layer: Add a thin layer of chocolate ganache on top of the crust before adding the cheesecake filling. To make a quick ganache, simply melt equal parts of chocolate chips and heavy cream.
- Chocolate Chips in the Filling: Mix in mini chocolate chips to add a little crunch and extra chocolate flavor to each bite.
2. Caramel Banana Crunch
- Caramel Swirl: Add a swirl of caramel sauce to the cheesecake filling by drizzling a few spoonfuls and gently swirling it in with a knife before spreading it over the crust.
- Toffee Bits: Sprinkle toffee bits on top of the crust or fold them into the filling for a hint of caramelized crunch.
- Drizzle with Extra Caramel: Once the cake is set, drizzle additional caramel sauce over each slice before serving for an indulgent touch.
3. Tropical Banana Coconut Cream Cake
- Coconut Crust: Mix shredded coconut with the Nilla Wafer crumbs for a tropical twist in the crust.
- Coconut Cream in the Filling: Replace part of the whipping cream with coconut cream to add a subtle coconut flavor to the filling.
- Pineapple Topping: Top the cake with crushed pineapple and banana slices for a refreshing, tropical-inspired garnish.
4. Strawberry Banana Cream Cake
- Strawberry Layer: Add a layer of fresh sliced strawberries on top of the crust before adding the cheesecake filling.
- Strawberry Garnish: Garnish with extra sliced strawberries and banana for a colorful and fruity topping.
- Strawberry Sauce Drizzle: Drizzle a homemade or store-bought strawberry sauce over the top for a sweet and tangy twist.
5. Peanut Butter Banana Cream Cake
- Peanut Butter Crust: Blend a couple of tablespoons of peanut butter into the melted butter before mixing it with the Nilla Wafer crumbs for a peanut-flavored crust.
- Peanut Butter Swirl: Swirl a few spoonfuls of creamy peanut butter into the cheesecake filling, creating a classic peanut butter-banana combination.
- Crushed Peanuts: Sprinkle crushed peanuts over the top as a garnish for added crunch.
6. Nutty Maple Banana Cream Cake
- Maple Flavor: Add a teaspoon of maple extract to the cheesecake filling for a rich, warm flavor that pairs beautifully with banana.
- Pecan Crust: Mix finely chopped pecans into the crust for a nutty, buttery texture.
- Maple Drizzle: Drizzle each slice with a bit of pure maple syrup before serving to enhance the maple flavor.
7. Espresso Banana Cream Cake
- Espresso Powder: Add a teaspoon of instant espresso powder to the cheesecake filling for a hint of coffee flavor that complements the banana.
- Coffee Crust: Use coffee-flavored cookies or add a touch of espresso powder to the Nilla Wafer crust for a richer base.
- Chocolate Espresso Drizzle: Drizzle with chocolate espresso sauce for a finishing touch and extra flavor.
Each of these variations adds a unique twist to the classic banana flavor, letting you tailor the cake to suit any occasion or craving!
FAQs
1. Can I make this cake in advance?
Yes! This cake can be made a day or two in advance. In fact, allowing it to chill overnight enhances the flavors and texture, making it even more delicious.
2. How long does this cake need to chill?
For best results, chill the cake for at least 8 hours or overnight to allow the filling to set fully. This ensures a firm and creamy texture.
3. Can I freeze this cake?
It’s not recommended to freeze this cake, as the creamy filling may change in texture upon thawing. For best results, keep it refrigerated and enjoy within 3 days.
4. What can I use if I don’t have Nilla Wafers?
If you don’t have Nilla Wafers, you can use graham crackers, shortbread cookies, or even Oreos (if you want a chocolate flavor). These substitutes work well in the crust.
5. Can I use homemade whipped cream instead of store-bought?
Absolutely! Homemade whipped cream adds a fresh and rich taste. Simply whip heavy cream with sugar until stiff peaks form, then fold it into the filling.
6. Can I use regular banana pudding instead of instant?
This recipe works best with instant banana pudding, as it thickens quickly. If you use regular banana pudding, it may not set as firmly, affecting the cake’s texture.
7. How do I prevent the bananas on top from browning?
To keep banana slices fresh and prevent browning, brush them lightly with lemon juice before placing them on the cake. This will help keep them looking fresh longer.
8. Can I add other fruits to this cake?
Yes, strawberries, blueberries, or pineapple work well with banana and add a colorful, fruity twist. You can layer sliced fruit on top or mix it into the filling.
9. What can I substitute for cream cheese if I want a lighter version?
For a lighter option, you can use reduced-fat cream cheese or Neufchâtel cheese, which have a similar flavor and texture with fewer calories and fat.
10. How should I store leftovers?
Store any leftover cake in an airtight container in the refrigerator for up to 3 days. Keep it covered to prevent it from absorbing other fridge odors and maintain its freshness.
This Heavenly Banana Walnut Cream Cake is a perfect combination of creamy, sweet, and subtly crunchy textures that will leave your taste buds delighted. With its easy no-bake approach, you can prepare this dessert in advance, making it an ideal choice for busy gatherings or a quick, indulgent treat. Once you try it, this recipe will undoubtedly become a favorite dessert that you’ll turn to time and time again. Enjoy the luscious flavors, and get ready for the rave reviews!
Print
Heavenly Banana Walnut Cream Cake Recipe: A Decadent Dessert to Impress
Description
If you’re a fan of rich, creamy desserts with the sweet flavors of banana and a hint of crunchy walnut, this Heavenly Banana Walnut Cream Cake is for you! This no-bake dessert combines smooth cream cheese, banana-flavored pudding, and a buttery Nilla Wafer crust for a luscious treat that’s bound to be a crowd-pleaser. Perfect for any occasion, this cake is easy to prepare and ideal for both everyday enjoyment and special gatherings.
Ingredients
- Crust
- 3 cups Nilla Wafer cookie crumbs (approximately one 11-ounce box)
- ½ cup butter, melted
- Filling
- 1 pint heavy whipping cream
- ¾ cup sugar
- 24 ounces cream cheese (3 8-ounce packages), softened
- 2 packages instant banana cream pudding mix (3.4 ounces each)
- Optional Garnish
- Whipped topping and banana slices for a beautiful finish
Instructions
1. Prepare the Crust
Start by preparing the base of this dessert: a buttery Nilla Wafer crust.
- In a medium mixing bowl, combine the Nilla Wafer crumbs and melted butter.
- Press this mixture firmly into the bottom of a square 8×8-inch baking pan (a 9×9-inch pan works well), lined with parchment paper that extends up the edges for easy removal later.
- Chill the crust in the refrigerator or freezer while you move on to preparing the filling.
2. Whip the Cream
The whipped cream adds a luxurious lightness to the cake’s filling.
- In a large metal mixing bowl, use an electric mixer on medium speed to whip the heavy cream and sugar together until stiff peaks form. This step is crucial to achieve the perfect texture for the filling. Set the whipped cream aside.
3. Mix the Cheesecake Filling
The cream cheese and banana pudding come together to create a delightful, banana-infused cheesecake layer.
- In another large mixing bowl, beat the softened cream cheese with an electric mixer on medium speed until smooth and creamy.
- Gradually add the dry pudding mixes, beating well between each addition to ensure a smooth mixture.
- Gently fold in the whipped cream until everything is well combined and fluffy.
4. Assemble and Chill
Once the filling is ready, it’s time to put it all together.
- Spread the cheesecake filling evenly over the chilled crust.
- Cover the pan with plastic wrap and refrigerate the cake for at least 8 hours or overnight, allowing it to set fully. This step is key to achieving the right texture and flavor.
5. Garnish and Serve
Finally, it’s time to enjoy this dreamy dessert!
- Once the cake has chilled, cut it into 9 squares for easy serving.
- Garnish with a dollop of whipped topping and banana slices for a finishing touch. Serve the cake chilled for the best experience.
Additional Recipe Tips
- Variations: Add crushed walnuts or chocolate chips to the crust for an extra layer of flavor. For a lighter dessert, you can use lower-fat cream cheese and sugar-free pudding.
- Storage: Store leftovers in an airtight container in the refrigerator for up to three days.
- Serving Suggestions: Pair this dessert with a cup of coffee or tea, or serve with additional banana slices for an extra burst of fruity goodness.
Notes
Serving Tips
- Serve Chilled: For the best flavor and texture, serve the cake chilled. The creamy filling holds its shape beautifully when served cold, offering a refreshing and smooth bite.
- Garnish with Fresh Banana Slices: Add freshly sliced bananas right before serving. This not only enhances the banana flavor but also adds a beautiful presentation. To prevent browning, you can brush the banana slices with a bit of lemon juice.
- Add a Whipped Topping Dollop: For an extra indulgent touch, top each slice with a dollop of whipped cream or whipped topping.
- Pair with Coffee or Tea: The cake’s rich, creamy flavor complements a cup of hot coffee or tea, adding a nice contrast to the dessert’s sweetness.
Storage Tips
- Refrigerate Leftovers: Store any leftover cake in an airtight container in the refrigerator for up to 3 days to keep it fresh.
- Cover Tightly: If you’re storing the cake in the same pan, cover it tightly with plastic wrap to prevent it from absorbing any refrigerator odors.
- Avoid Freezing: This dessert is best enjoyed fresh. Freezing may alter the creamy texture of the filling and cause separation upon thawing.
- Prepare in Advance: The cake can be prepared up to a day in advance, making it a convenient dessert option for parties and gatherings. Just add garnishes right before serving.
Enjoy every creamy, banana-filled bite with these simple serving and storage tips to keep your cake tasting fresh and delightful!
