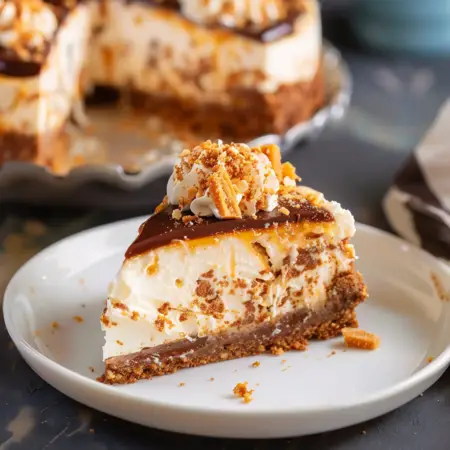
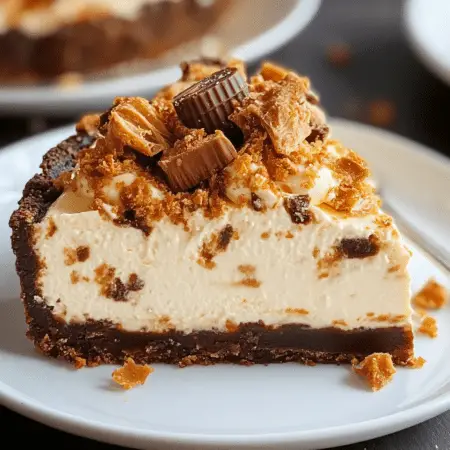
Craving a dessert that combines the creamy richness of cheesecake with the irresistible crunch of Butterfinger candy bars? Look no further than this tantalizing Butterfinger Cheesecake recipe! With a luscious Oreo crust, velvety cheesecake filling studded with chunks of Butterfingers, and a luxurious chocolate ganache topping, this dessert is a slice of pure indulgence. Let’s dive into the details of how to create this decadent masterpiece in your own kitchen.

Ingredients:
For the Crust:
- 2 1/4 cups Oreo crumbs
- 4 tbsp salted butter, melted
For the Filling:
- 24 oz cream cheese, room temperature
- 1 cup sugar
- 3 tbsp all-purpose flour
- 3/4 cup sour cream, room temperature
- 1/2 cup peanut butter
- 1 tsp vanilla extract
- 4 large eggs, room temperature
- 1 1/2 cups chopped Butterfingers
For the Ganache:
- 6 oz semi-sweet chocolate chips
- 1/2 cup heavy whipping cream
For the Whipped Cream:
- 3/4 cup heavy whipping cream
- 1/2 cup powdered sugar
- 2 tbsp peanut butter
- 1/4 tsp vanilla extract
Garnish:
- Chopped Butterfingers
Directions:
- Crust Preparation: Mix Oreo crumbs with melted butter, press into the bottom of the pan, and bake at 325°F for 10 minutes. Prepare a water bath for later use.
- Filling: Beat cream cheese, sugar, and flour until smooth. Add sour cream, peanut butter, and vanilla. Incorporate eggs one at a time, then fold in chopped Butterfingers. Pour filling over crust and place in a water bath. Bake at 300°F for 1 hour and 25 minutes.
- Ganache: Heat heavy cream until hot but not boiling. Pour over chocolate chips, let sit, then stir until smooth. Spread ganache over cooled cheesecake.
- Whipped Cream: Whip heavy cream, powdered sugar, peanut butter, and vanilla until stiff peaks form. Decorate cheesecake with whipped cream and sprinkle chopped Butterfingers for garnish.
- Chill: Refrigerate cheesecake for at least 4 hours or overnight before serving.
Enjoyment:
Delight in every decadent bite of this Butterfinger Cheesecake, whether you’re celebrating a special occasion or simply indulging in a moment of sweet bliss. With its creamy texture, crunchy candy bar chunks, and rich chocolate ganache, this dessert is sure to impress even the most discerning dessert lovers. Share it with friends and family or savor it all to yourself – either way, it’s bound to be a hit!

Serving and Storage Tips:
- Serving Suggestions: Serve slices of Butterfinger Cheesecake chilled for the best flavor and texture experience. Consider adding a dollop of whipped cream on top for an extra touch of indulgence.
- Portion Control: This cheesecake is rich and decadent, so consider slicing it into smaller portions, especially if serving it alongside other desserts or dishes. A little goes a long way with this dessert!
- Refrigeration: After serving, store any leftover cheesecake in the refrigerator promptly. Cover the cheesecake with plastic wrap or place it in an airtight container to prevent it from absorbing any odors from the fridge.
- Shelf Life: The Butterfinger Cheesecake will stay fresh in the refrigerator for up to 5-7 days. However, with its irresistible taste, it’s unlikely to last that long!
- Freezing Option: If you want to extend the shelf life, you can freeze individual slices of cheesecake. Wrap each slice tightly in plastic wrap and then aluminum foil before placing them in a freezer-safe container. Frozen cheesecake slices can last for up to 1-2 months.
- Thawing: When ready to enjoy a frozen slice, thaw it in the refrigerator overnight. This gradual thawing process helps preserve the texture and flavor of the cheesecake.
- Room Temperature: Before serving, allow the cheesecake to sit at room temperature for about 15-20 minutes to soften slightly. This allows the flavors to fully develop and makes for a smoother, creamier texture.
- Garnish Freshness: If adding additional chopped Butterfingers as a garnish, sprinkle them on top just before serving to maintain their crunchy texture and vibrant appearance.
By following these serving and storage tips, you can ensure that your Butterfinger Cheesecake stays fresh, delicious, and ready to enjoy whenever the craving strikes. Whether you’re serving it for a special occasion or simply treating yourself to a decadent dessert, this cheesecake is sure to impress!
Variations:
- Peanut Butter Cup Cheesecake: Swap out the Butterfinger candy bars for chopped peanut butter cups to create a Peanut Butter Cup Cheesecake. The combination of creamy cheesecake and peanut butter cups is sure to be a crowd-pleaser.
- Chocolate Lover’s Cheesecake: For those who can’t get enough chocolate, incorporate additional chocolate elements into the cheesecake. Mix chocolate chips into the cheesecake batter or drizzle melted chocolate over the top instead of ganache for an extra chocolatey twist.
- Caramel Swirl Cheesecake: Add a swirl of caramel sauce to the cheesecake batter before baking to create a beautiful marbled effect. The combination of creamy cheesecake, crunchy Butterfingers, and gooey caramel is simply irresistible.
- Nutty Crunch Cheesecake: Experiment with different types of nuts in the crust or filling to add a crunchy texture and nutty flavor to the cheesecake. Try using chopped peanuts, almonds, or hazelnuts for a delicious variation.
- Cookie Crust Cheesecake: Switch up the Oreo crust by using your favorite cookies instead. Graham crackers, chocolate chip cookies, or even shortbread cookies can be used to create a unique and flavorful crust for your cheesecake.
- Seasonal Variations: Customize the cheesecake to suit the season by incorporating seasonal flavors and ingredients. For example, add pumpkin puree and pumpkin pie spice for a festive fall twist, or top the cheesecake with fresh berries for a summery touch.
- No-Bake Option: If you prefer not to use the oven, you can make a no-bake version of this cheesecake. Simply prepare the crust as directed and then chill it in the refrigerator while you mix together the filling ingredients. Pour the filling over the crust and refrigerate the cheesecake until set. Top with ganache, whipped cream, and chopped Butterfingers before serving.
- Mini Cheesecake Bites: Instead of making a full-sized cheesecake, portion the crust and filling into mini muffin tins to create adorable mini cheesecake bites. These bite-sized treats are perfect for parties and gatherings.
Get creative and try out these variations to customize your Butterfinger Cheesecake and make it your own. Whether you stick to the original recipe or experiment with different flavors and textures, this cheesecake is sure to be a hit!
FAQs:
- Can I use a different type of candy bar instead of Butterfingers? Yes, you can customize the cheesecake by using your favorite candy bar instead of Butterfingers. Snickers, Reese’s Cups, or Twix bars are popular alternatives that would work well in this recipe.
- Can I make the cheesecake ahead of time? Yes, you can make the cheesecake ahead of time. It actually benefits from chilling in the refrigerator for several hours or overnight before serving, as it allows the flavors to meld together and the texture to set properly.
- Can I omit the peanut butter from the filling? While peanut butter adds a distinct flavor to the cheesecake, you can omit it if you have allergies or simply prefer a cheesecake without peanut butter. Just be aware that the flavor profile will be slightly different.
- Can I use reduced-fat cream cheese or sour cream? While you can use reduced-fat cream cheese or sour cream, keep in mind that it may affect the texture and richness of the cheesecake. Full-fat versions typically yield the best results in terms of flavor and texture.
- Can I make this cheesecake gluten-free? Yes, you can make this cheesecake gluten-free by using gluten-free Oreo-style cookies for the crust and ensuring that all other ingredients are certified gluten-free. Be sure to check labels carefully to avoid any gluten-containing ingredients.
- How do I prevent cracks from forming on the surface of the cheesecake? To prevent cracks, avoid overmixing the batter and be sure to bake the cheesecake in a water bath. The water bath helps regulate the temperature and prevents the cheesecake from baking too quickly, which can cause cracks to form.
With its combination of creamy cheesecake, crunchy Butterfingers, and velvety ganache, this Butterfinger Cheesecake recipe is a true showstopper. Follow the steps outlined above to create your own slice of heaven and treat yourself to a dessert experience like no other. Whether you’re a fan of peanut butter, chocolate, or just good old-fashioned indulgence, this cheesecake is sure to satisfy your sweet tooth and leave you craving more.
Print
Butterfinger Cheesecake Recipe
Description
Craving a dessert that combines the creamy richness of cheesecake with the irresistible crunch of Butterfinger candy bars? Look no further than this tantalizing Butterfinger Cheesecake recipe! With a luscious Oreo crust, velvety cheesecake filling studded with chunks of Butterfingers, and a luxurious chocolate ganache topping, this dessert is a slice of pure indulgence. Let’s dive into the details of how to create this decadent masterpiece in your own kitchen.
Ingredients
For the Crust:
- 2 1/4 cups Oreo crumbs
- 4 tbsp salted butter, melted
For the Filling:
- 24 oz cream cheese, room temperature
- 1 cup sugar
- 3 tbsp all-purpose flour
- 3/4 cup sour cream, room temperature
- 1/2 cup peanut butter
- 1 tsp vanilla extract
- 4 large eggs, room temperature
- 1 1/2 cups chopped Butterfingers
For the Ganache:
- 6 oz semi-sweet chocolate chips
- 1/2 cup heavy whipping cream
For the Whipped Cream:
- 3/4 cup heavy whipping cream
- 1/2 cup powdered sugar
- 2 tbsp peanut butter
- 1/4 tsp vanilla extract
Garnish:
- Chopped Butterfingers
Instructions
- Crust Preparation: Mix Oreo crumbs with melted butter, press into the bottom of the pan, and bake at 325°F for 10 minutes. Prepare a water bath for later use.
- Filling: Beat cream cheese, sugar, and flour until smooth. Add sour cream, peanut butter, and vanilla. Incorporate eggs one at a time, then fold in chopped Butterfingers. Pour filling over crust and place in a water bath. Bake at 300°F for 1 hour and 25 minutes.
- Ganache: Heat heavy cream until hot but not boiling. Pour over chocolate chips, let sit, then stir until smooth. Spread ganache over cooled cheesecake.
- Whipped Cream: Whip heavy cream, powdered sugar, peanut butter, and vanilla until stiff peaks form. Decorate cheesecake with whipped cream and sprinkle chopped Butterfingers for garnish.
- Chill: Refrigerate cheesecake for at least 4 hours or overnight before serving.
Enjoyment:
Delight in every decadent bite of this Butterfinger Cheesecake, whether you’re celebrating a special occasion or simply indulging in a moment of sweet bliss. With its creamy texture, crunchy candy bar chunks, and rich chocolate ganache, this dessert is sure to impress even the most discerning dessert lovers. Share it with friends and family or savor it all to yourself – either way, it’s bound to be a hit!
Notes
- Serving Suggestions: Serve slices of Butterfinger Cheesecake chilled for the best flavor and texture experience. Consider adding a dollop of whipped cream on top for an extra touch of indulgence.
- Portion Control: This cheesecake is rich and decadent, so consider slicing it into smaller portions, especially if serving it alongside other desserts or dishes. A little goes a long way with this dessert!
- Refrigeration: After serving, store any leftover cheesecake in the refrigerator promptly. Cover the cheesecake with plastic wrap or place it in an airtight container to prevent it from absorbing any odors from the fridge.
- Shelf Life: The Butterfinger Cheesecake will stay fresh in the refrigerator for up to 5-7 days. However, with its irresistible taste, it’s unlikely to last that long!
- Freezing Option: If you want to extend the shelf life, you can freeze individual slices of cheesecake. Wrap each slice tightly in plastic wrap and then aluminum foil before placing them in a freezer-safe container. Frozen cheesecake slices can last for up to 1-2 months.
- Thawing: When ready to enjoy a frozen slice, thaw it in the refrigerator overnight. This gradual thawing process helps preserve the texture and flavor of the cheesecake.
- Room Temperature: Before serving, allow the cheesecake to sit at room temperature for about 15-20 minutes to soften slightly. This allows the flavors to fully develop and makes for a smoother, creamier texture.
- Garnish Freshness: If adding additional chopped Butterfingers as a garnish, sprinkle them on top just before serving to maintain their crunchy texture and vibrant appearance.
By following these serving and storage tips, you can ensure that your Butterfinger Cheesecake stays fresh, delicious, and ready to enjoy whenever the craving strikes. Whether you’re serving it for a special occasion or simply treating yourself to a decadent dessert, this cheesecake is sure to impress!
