Butterfinger Balls Recipe

If you’re looking for a delectable and easy-to-make treat, this Butterfinger Balls recipe is perfect for you. Combining the delightful crunch of Butterfinger bars with the smooth richness of chocolate and peanut butter, these no-bake treats are sure to be a hit. Whether you’re preparing for a party or just satisfying a sweet craving, these Butterfinger Balls will not disappoint. Let’s dive into the recipe!

Ingredients:

To make these delicious Butterfinger Balls, you’ll need the following ingredients:

  • 1 (16-oz) box powdered sugar
  • 2½ cups graham cracker crumbs
  • 5 (1.9-oz) Butterfinger bars, crushed
  • 1¼ cups butter, melted
  • 1½ cups crunchy peanut butter
  • 1 (24-oz) package chocolate almond bark or your preferred chocolate candy coating

Instructions:

Step 1: Combine the Dry and Wet Ingredients In a large bowl, mix together the powdered sugar, graham cracker crumbs, crushed Butterfinger bars, melted butter, and peanut butter until well combined. This mixture will form the base of your Butterfinger Balls.

Step 2: Form the Balls Roll the mixture into 1-inch balls and place them on a baking sheet. Ensuring uniform size will help with even coating and presentation.

Step 3: Chill the Balls Refrigerate the balls for 30 minutes to firm them up. This step is crucial as it makes the balls easier to handle when coating with chocolate.

Step 4: Melt the Chocolate Coating Melt the chocolate coating according to the package instructions. You can use a microwave or a double boiler for this process. Make sure the chocolate is smooth and fully melted.

Step 5: Dip the Balls in Chocolate Dip each ball into the melted chocolate, then place them on a sheet of parchment paper. Using a fork or a dipping tool can make this process cleaner and more efficient.

Step 6: Let the Chocolate Set Allow the chocolate to set completely before serving. You can speed up this process by placing the balls in the refrigerator.

Serving and Storage Tips:

To make the most out of your delightful Butterfinger Balls, here are some essential serving and storage tips:

Serving Tips:

1. Serve Chilled or at Room Temperature Butterfinger Balls taste fantastic whether served chilled or at room temperature. Chilled, they offer a firmer texture, while at room temperature, they become softer and melt in your mouth.

2. Presentation Matters Arrange your Butterfinger Balls on a decorative plate or a tiered dessert stand. Add a sprinkle of crushed Butterfinger bars on top for extra flair and to hint at the delicious interior.

3. Pairing Suggestions These sweet treats pair wonderfully with a cup of coffee or a glass of cold milk. They also make an excellent addition to a dessert platter alongside other bite-sized goodies.

4. Themed Occasions Customize the presentation of your Butterfinger Balls to match the theme of your event. For holidays, you can use colored sprinkles or drizzle with white chocolate dyed in festive colors.

Storage Tips:

1. Refrigeration Store your Butterfinger Balls in an airtight container in the refrigerator. They will keep well for up to two weeks. Refrigeration helps maintain their shape and texture.

2. Freezing for Longer Storage For longer storage, you can freeze Butterfinger Balls. Place them in a single layer on a baking sheet to freeze initially. Once frozen, transfer them to a freezer-safe container or zip-top bag. They can be stored in the freezer for up to three months. Thaw in the refrigerator or at room temperature before serving.

3. Separation Layers When storing Butterfinger Balls, use parchment paper to separate the layers. This prevents them from sticking together and helps maintain their perfect shape.

4. Avoid Moisture and Heat Keep the Butterfinger Balls away from direct sunlight, moisture, and heat sources to prevent the chocolate coating from melting or becoming sticky.

5. Refreshing the Coating If the chocolate coating appears dull or has developed a slight bloom (white streaks or spots), you can refresh the appearance by lightly brushing the balls with a bit of melted chocolate or cocoa butter.
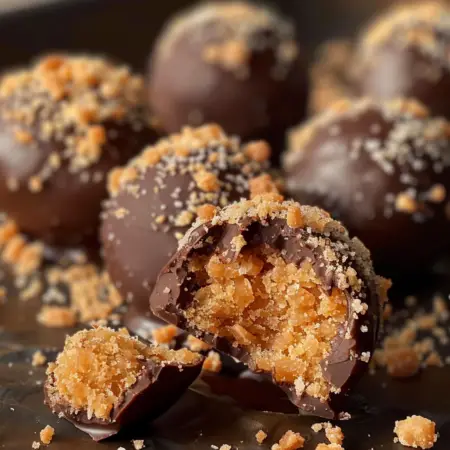
By following these serving and storage tips, you can ensure your Butterfinger Balls remain delicious and ready to enjoy at any time. Whether you’re hosting a party, sharing with friends, or indulging in a sweet treat yourself, these tips will help you make the most of this delightful recipe.

Variations :

The classic Butterfinger Balls recipe is already a delightful treat, but with a few creative twists, you can make it even more exciting. Here are some variations to try:

1. White Chocolate Butterfinger Balls

Ingredients:

  • Substitute the chocolate almond bark with white chocolate candy coating.
  • Optional: Add a few drops of food coloring to the white chocolate for a festive touch.

Instructions: Follow the original recipe, but use melted white chocolate for dipping. This variation adds a creamy sweetness and a visually appealing contrast.

2. Dark Chocolate Butterfinger Balls

Ingredients:

  • Use dark chocolate candy coating instead of milk chocolate.

Instructions: Replace the regular chocolate coating with dark chocolate for a richer, slightly bitter flavor that balances the sweetness of the Butterfinger bars and peanut butter.

3. Coconut Butterfinger Balls

Ingredients:

  • Add 1 cup of shredded coconut to the mixture.
  • Use coconut-flavored chocolate coating, if available.

Instructions: Mix shredded coconut into the base mixture before forming the balls. The coconut adds a tropical twist and extra texture.

4. Nutty Butterfinger Balls

Ingredients:

  • Add 1 cup of finely chopped nuts (such as almonds, pecans, or walnuts) to the mixture.
  • Use nut-flavored chocolate coating, if available.

Instructions: Incorporate the chopped nuts into the base mixture. The added crunch from the nuts enhances the overall texture and flavor profile.

5. Mint Butterfinger Balls

Ingredients:

  • Add 1 teaspoon of mint extract to the mixture.
  • Use mint-flavored chocolate coating or add a few drops of mint extract to regular chocolate coating.

Instructions: Mix mint extract into the base mixture before forming the balls. This variation adds a refreshing minty flavor that pairs wonderfully with the chocolate and peanut butter.

6. Oreo Butterfinger Balls

Ingredients:

  • Substitute 1 cup of graham cracker crumbs with crushed Oreo cookies.
  • Use a mix of white and dark chocolate for dipping.

Instructions: Replace part of the graham cracker crumbs with Oreo crumbs for a cookies-and-cream twist. Dip in a mix of white and dark chocolate for an appealing look and taste.

7. Espresso Butterfinger Balls

Ingredients:

  • Add 1 tablespoon of instant espresso powder to the mixture.
  • Use dark chocolate coating.

Instructions: Incorporate instant espresso powder into the base mixture. This variation adds a sophisticated coffee flavor, perfect for coffee lovers.

8. Salted Caramel Butterfinger Balls

Ingredients:

  • Add a pinch of sea salt to the mixture.
  • Drizzle caramel sauce over the chocolate-coated balls.
  • Sprinkle a bit of sea salt on top of the caramel drizzle.

Instructions: Mix a pinch of sea salt into the base mixture for a subtle salty contrast. After coating in chocolate, drizzle with caramel sauce and sprinkle with additional sea salt for a sweet and salty treat.

These variations allow you to customize the Butterfinger Balls to suit different tastes and occasions. Whether you prefer a hint of mint, the crunch of nuts, or the richness of dark chocolate, there’s a version of this treat that’s perfect for you. Enjoy experimenting and finding your favorite combination!

FAQs :

1. Can I use creamy peanut butter instead of crunchy peanut butter?

Yes, you can use creamy peanut butter instead of crunchy peanut butter. The texture will be smoother, but the taste will remain delicious. If you prefer a bit of crunch, you can add chopped nuts to the mixture.

2. How can I make the Butterfinger Balls dairy-free?

To make Butterfinger Balls dairy-free, use dairy-free substitutes for butter and chocolate coating. Many grocery stores offer dairy-free margarine or vegan butter and dairy-free chocolate options.

3. Can I use other candy bars instead of Butterfinger?

Absolutely! You can substitute Butterfinger bars with other candy bars like Snickers, Milky Way, or Reese’s Peanut Butter Cups. The flavor will change depending on the candy you choose, offering a fun way to experiment with different tastes.

4. How long do Butterfinger Balls last?

Butterfinger Balls can last up to two weeks when stored in an airtight container in the refrigerator. If you freeze them, they can last for up to three months. Make sure to thaw them in the refrigerator or at room temperature before serving.

5. Do I need to refrigerate the Butterfinger Balls after making them?

Yes, it’s best to refrigerate the Butterfinger Balls after making them, especially if the weather is warm. Refrigeration helps the chocolate coating to set properly and keeps the balls firm.

Once the chocolate has set, your Butterfinger Balls are ready to be enjoyed. These treats are perfect for sharing with friends and family or indulging in on your own. With their irresistible combination of flavors and textures, Butterfinger Balls are sure to become a favorite in your dessert repertoire.

Remember, you can always customize this recipe by experimenting with different types of chocolate coatings or adding a sprinkle of sea salt on top for a gourmet touch. Happy baking!