Homemade cornflakes are a fun and crunchy breakfast cereal made with sweet corn, flour, and a few simple pantry ingredients. This easy recipe lets you create golden, crispy flakes at home that taste delicious with cold milk, yogurt, or your favorite breakfast toppings.

Ingredients
- 2 cups sweet corn kernels, fresh or frozen
- 1½ cups all-purpose flour
- ½ cup cornmeal or finely ground maize
- 3 tablespoons sugar
- 2 tablespoons melted butter
- ½ teaspoon salt
- 1 teaspoon baking powder
- ½ teaspoon vanilla extract (optional)
- ¼–½ cup water or milk, as needed
- Vegetable oil for frying, if using the frying method
Instructions
- Prepare the corn: Remove the kernels from fresh corn or thaw frozen corn completely.
- Cook the corn: Boil the kernels until tender, then drain them thoroughly.
- Blend the corn: Blend the cooked kernels into a smooth paste, adding only a small amount of water if necessary.
- Mix the dry ingredients: In a large bowl, combine the flour, cornmeal, sugar, salt, and baking powder.
- Make the dough: Add the corn puree, melted butter, and vanilla extract. Mix until combined, adding water or milk gradually until a firm, workable dough forms.
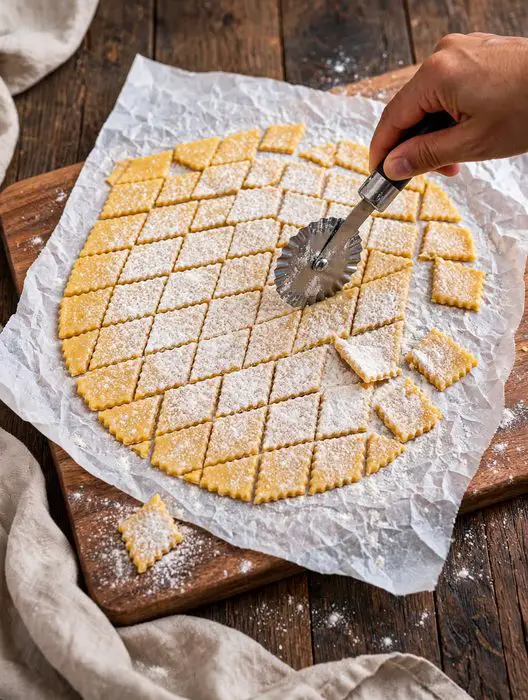
- Roll the dough: Place the dough between two sheets of baking paper and roll it as thinly as possible.
- Cut into flakes: Use a knife or small cutter to cut the dough into tiny flakes of similar thickness.
- Arrange on trays: Spread the flakes in a single layer on a baking tray lined with baking paper.
- Bake the flakes: Bake at 160°C (320°F) for approximately 20–30 minutes, turning as needed, until dry and lightly golden.
- Dry for extra crunch: Reduce the temperature to 120°C (250°F) and bake for another 10–20 minutes, checking frequently to prevent burning.
- Cool completely: Remove the flakes from the oven and let them cool fully. They should become crisp as they cool.
- Store and serve: Transfer the cooled cornflakes to an airtight container and serve with milk, yogurt, or your favorite toppings.
Serving and Storage Tips
- Serve with milk: Enjoy your homemade cornflakes with cold or warm milk for a simple breakfast.
- Add fresh fruit: Top with sliced bananas, strawberries, blueberries, or diced apples.
- Make a yogurt bowl: Combine the flakes with plain or flavored yogurt, honey, and fresh fruit.
- Add extra crunch: Sprinkle the cornflakes over smoothie bowls or breakfast parfaits.
- Cool completely: Make sure the flakes are completely cool before storing to prevent trapped moisture.
- Store properly: Keep them in a clean, dry, airtight container in a cool pantry.
- Maintain crispness: Avoid storing the cereal near steam or other sources of moisture.
- Storage time: For the best crunch and flavor, consume within 1–2 weeks, provided the flakes are thoroughly dried and stored in a dry, airtight container.
- Refresh softened flakes: If they lose their crunch, spread them on a baking tray and warm them in a low oven at 120°C (250°F) for a few minutes. Cool completely before serving.
- Avoid refrigeration: Refrigeration can introduce moisture and make the flakes less crispy.
Variations
1. Honey Cornflakes
Replace some or all of the sugar with honey for a naturally sweet flavor. Mix the honey into the corn puree and butter before adding the dry ingredients. Because honey adds moisture, use less additional liquid and dry the flakes thoroughly.
2. Cinnamon Cornflakes
Add 1 teaspoon of ground cinnamon to the dry ingredients. The warm spice gives the cereal a comforting flavor that pairs beautifully with milk, bananas, and apples.
3. Vanilla Cornflakes
Increase the vanilla extract to 1 teaspoon for a sweeter, bakery-style aroma. This version is especially delicious served with cold milk and fresh strawberries.
4. Chocolate Cornflakes
Add 2 tablespoons of unsweetened cocoa powder to the flour mixture. You may need a little extra liquid to bring the dough together. Bake and dry carefully because the darker color makes it harder to judge browning.
5. Coconut Cornflakes
Add ¼ cup of finely shredded unsweetened coconut to the dry ingredients. The coconut gives the flakes a delicate tropical flavor and pairs well with yogurt and sliced pineapple.
6. Banana Cornflakes
Replace a small portion of the liquid with ¼ cup of mashed ripe banana. This adds natural sweetness and a mild banana flavor. Since banana adds moisture, roll the dough thinly and allow additional drying time if needed.
7. Maple Cornflakes
Replace some of the sugar with 1–2 tablespoons of maple syrup. Reduce the other liquid slightly and monitor the flakes closely during baking because the added sugars can brown quickly.
8. Peanut Butter Cornflakes
Add 2 tablespoons of smooth peanut butter to the wet ingredients. The result has a subtle nutty taste that works well with milk or sliced bananas. Adjust the liquid gradually to keep the dough workable.
9. Almond Cornflakes
Replace ¼ cup of the flour with finely ground almonds. This adds a delicate nutty flavor and pairs especially well with vanilla. Avoid using coarse almond pieces because they can make the thin dough difficult to roll evenly.
10. Lemon Cornflakes
Add 1 teaspoon of finely grated lemon zest to the dough. The citrus aroma gives the cereal a refreshing flavor that tastes lovely with plain yogurt and berries.
11. Whole Wheat Cornflakes
Replace half the all-purpose flour with whole wheat flour. The flakes will have a more rustic flavor and slightly heartier texture. Add liquid gradually because whole wheat flour may absorb moisture differently.
12. Gluten-Free Cornflakes
Replace the all-purpose flour with a gluten-free all-purpose baking blend designed for a one-to-one substitution. Check that the cornmeal and other ingredients are certified gluten-free if needed. Adjust the liquid gradually and allow the dough to rest briefly before rolling.
13. Savory Herb Cornflakes
Reduce the sugar to 1 teaspoon and add ½ teaspoon of dried rosemary or mixed herbs. These less-sweet flakes can be enjoyed as a crunchy snack or sprinkled over soups and salads.
14. Spicy Cornflakes
Reduce the sugar and add a pinch of paprika, black pepper, or chili powder. This variation creates a savory cereal-style snack with a gentle kick. Use a light hand with the spices so they do not overpower the corn flavor.
15. Crunchy Seed Cornflakes
Add 1–2 tablespoons of finely ground sunflower seeds or sesame seeds to the dough. The seeds provide extra texture and a toasted flavor. Keep the dough thin and bake until thoroughly dry for the best crunch.
FAQs
1. Can I make cornflakes without a food processor?
Yes. You can mash the cooked corn thoroughly with a potato masher and then press it through a fine sieve. A blender or food processor will produce a smoother paste, which makes the dough easier to roll thinly.
2. Can I use canned corn?
Yes. Drain and rinse canned corn thoroughly before boiling briefly if needed. Drain it again and blend until smooth. Since canned corn may contain added salt, adjust the seasoning accordingly.
3. Why are my homemade cornflakes not crispy?
They may be too thick, contain excess moisture, or have been removed from the oven too early. Roll the dough thinner, drain the corn thoroughly, and finish drying the flakes at a low temperature.
4. How thin should I roll the dough?
Roll it as thinly and evenly as possible, ideally around 1–2 mm thick. Thin flakes dry faster and are more likely to become crunchy throughout.
5. Can I fry homemade cornflakes instead of baking them?
You can experiment with frying small, thin pieces, but this dough may not puff or behave like commercial cornflakes. Frying can also leave the flakes oily or unevenly cooked. The oven-drying method is the better choice for this recipe.
6. Can I make this recipe without sugar?
Yes. Reduce or omit the sugar for a less-sweet cereal. The flavor will be more corn-forward, and the flakes may brown differently, so monitor them closely while baking.
7. How do I know when the cornflakes are ready?
They should look dry and lightly golden, with no soft or damp centers. They may still feel slightly tender when hot, so allow them to cool completely before judging their final crispness.
8. How long do homemade cornflakes last?
For the best quality, use them within 1–2 weeks when thoroughly dried and stored in an airtight container in a cool, dry place. Discard them if they develop an unusual smell, visible mold, or signs of moisture spoilage.
9. Can I make homemade cornflakes gluten-free?
Yes. Use a suitable gluten-free flour blend and verify that all other ingredients are gluten-free. The texture may differ slightly, so adjust the liquid carefully and roll the dough between baking paper.
10. Can I prepare homemade cornflakes ahead of time?
Yes. Bake and dry the flakes in advance, then cool them completely before storing. Making sure they are thoroughly dry before sealing the container is essential for preserving their crunch.
Homemade cornflakes are a creative way to turn simple corn and pantry staples into a crunchy breakfast cereal. With thinly rolled dough, careful baking, and thorough drying, you can make golden flakes that are delicious with milk, yogurt, or fresh fruit. Try different flavors to create a homemade cereal that suits your taste.
Print
Homemade Cornflakes Recipe
Description
Homemade cornflakes are a fun and crunchy breakfast cereal made with sweet corn, flour, and a few simple pantry ingredients. This easy recipe lets you create golden, crispy flakes at home that taste delicious with cold milk, yogurt, or your favorite breakfast toppings.
Ingredients
- 2 cups sweet corn kernels, fresh or frozen
- 1½ cups all-purpose flour
- ½ cup cornmeal or finely ground maize
- 3 tablespoons sugar
- 2 tablespoons melted butter
- ½ teaspoon salt
- 1 teaspoon baking powder
- ½ teaspoon vanilla extract (optional)
- ¼–½ cup water or milk, as needed
- Vegetable oil for frying, if using the frying method
Instructions
- Prepare the corn: Remove the kernels from fresh corn or thaw frozen corn completely.
- Cook the corn: Boil the kernels until tender, then drain them thoroughly.
- Blend the corn: Blend the cooked kernels into a smooth paste, adding only a small amount of water if necessary.
- Mix the dry ingredients: In a large bowl, combine the flour, cornmeal, sugar, salt, and baking powder.
- Make the dough: Add the corn puree, melted butter, and vanilla extract. Mix until combined, adding water or milk gradually until a firm, workable dough forms.
- Roll the dough: Place the dough between two sheets of baking paper and roll it as thinly as possible.
- Cut into flakes: Use a knife or small cutter to cut the dough into tiny flakes of similar thickness.
- Arrange on trays: Spread the flakes in a single layer on a baking tray lined with baking paper.
- Bake the flakes: Bake at 160°C (320°F) for approximately 20–30 minutes, turning as needed, until dry and lightly golden.
- Dry for extra crunch: Reduce the temperature to 120°C (250°F) and bake for another 10–20 minutes, checking frequently to prevent burning.
- Cool completely: Remove the flakes from the oven and let them cool fully. They should become crisp as they cool.
- Store and serve: Transfer the cooled cornflakes to an airtight container and serve with milk, yogurt, or your favorite toppings.
Notes
- Serve with milk: Enjoy your homemade cornflakes with cold or warm milk for a simple breakfast.
- Add fresh fruit: Top with sliced bananas, strawberries, blueberries, or diced apples.
- Make a yogurt bowl: Combine the flakes with plain or flavored yogurt, honey, and fresh fruit.
- Add extra crunch: Sprinkle the cornflakes over smoothie bowls or breakfast parfaits.
- Cool completely: Make sure the flakes are completely cool before storing to prevent trapped moisture.
- Store properly: Keep them in a clean, dry, airtight container in a cool pantry.
- Maintain crispness: Avoid storing the cereal near steam or other sources of moisture.
- Storage time: For the best crunch and flavor, consume within 1–2 weeks, provided the flakes are thoroughly dried and stored in a dry, airtight container.
- Refresh softened flakes: If they lose their crunch, spread them on a baking tray and warm them in a low oven at 120°C (250°F) for a few minutes. Cool completely before serving.
- Avoid refrigeration: Refrigeration can introduce moisture and make the flakes less crispy.